Tuesday, June 30, 2009

Tutorial and Giveaway -- Baby Bib from Old Jeans

Photos for today's post are courtesy of Emily! Awhile ago, my father called to ask me if I had any use for a bunch of his old jeans. "Sure, pass them along! I'm sure I'll think of something... Hmmm...." Turns out it was a large box full of several different pairs of jeans, and the box sat around for a few months while I churned different ideas of what to do with them in the back of my mind for awhile. While I was in the middle of feeding Clara one afternoon, it came to me! Baby bibs!! And these are so easy to make! I can get about 1 dozen bibs from a single pair of jeans!

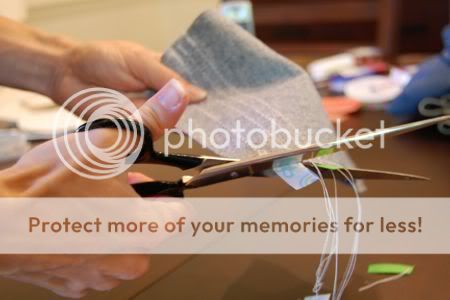
To make your own baby bibs from a pair of jeans, cut the legs off of the jeans, and cut next to the inseam as shown. This will give you a single layer of denim.

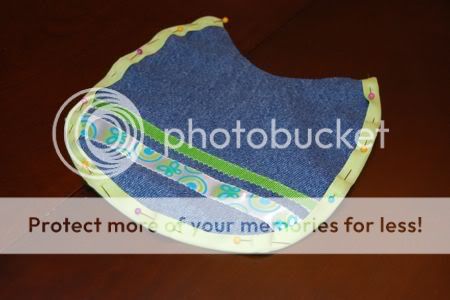
I made my own pattern from a bib that Clara already had. This one is the perfect size. If my scanner were working properly, I would upload a pattern for you to download, but sadly it is yelling at me... something about an incompatible ink cartridge. Blecchh! Anyway, pin your pattern to the denim and carefully cut it as shown.

Pin some ribbon along the bottom. I found several beautiful spools of ribbon at Big Lots for $1! Scraps of ribbon is really all you need to dress up the bib a bit. Once it is pinned in place, sew along both edges with a zig-zag stitch.

Flip the bib over, and trim any excess ribbon and thread.

Pin the bias tape along the outer edge of the bib as shown. Sew this with a straight stitch. Go slowly to prevent the bias tape from having any creases. I used wide single fold bias tape that I found on clearance at JoAnn for $0.97!

Cut a 24" length of bias tape and fold in half to find the mid-point. Attach the midpoint to the middle of the neckline of the bib. Pin in place as shown. Starting at one end of the bias tape, sew a straight stitch all along the edge of the tape, along the neckline of the bib, and down the length of the other side of the tape. Knot the ends of the bias tape to keep the edges from fraying.

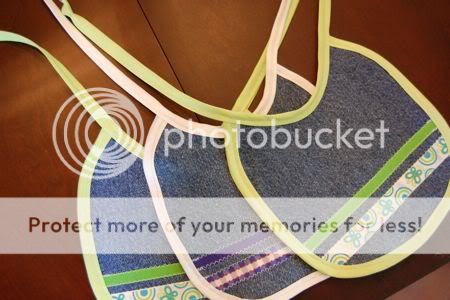
Here's a close up of a finished bib.

I'll be making plenty of these for Clara, and for baby shower gifts!

Now the fun part, one lucky reader will win one of these adorable bibs! Leave a comment with your color preference (indicate for a boy or girl) and be sure to include your email for a chance to win this fun giveaway. Giveaway ends Wednesday, July 8th @ 6:30pm EST. Winner will be chosen by random.org.... Good luck!

Don't forget, tomorrow is the last day of the Caption Contest. Click here to submit your entry for a chance to win a $10 Barnes and Noble Gift Card!

Monday, June 29, 2009

Easy Waterproof Windsock

This windsock craft could not be any easier, or more inexpensive. It is made of recyclables and is waterproof. We're planning to make a few more to decorate our garden! To make your own waterproof windsock, you will need: scissors, string, plastic bags, and an empty soda bottle.

Cut a ring from the soda bottle as shown. The edges may be a little sharp, so use caution.


Cut 1 inch wide strips out of the plastic bags. The more colorful the bags, the prettier your windsock will be!

Fold the strip in half and thread the folded end through the soda bottle ring. You should have a loop on one side of the ring, and the tails on the other.

Thread the tails of the plastic strip through the loop, and pull gently. Repeat with all of your plastic strips until the soda bottle ring is completely covered.

Hang and enjoy! Emily wanted to run around with hers a bit first.....


So much fun!!

Sunday, June 28, 2009

Shopping with Intention


Now that Emily has recovered from this incident, I took her to Dollar Tree this afternoon for a special shopping trip to fill some Jared Boxes for our local hospital. If you are not familiar with Jared Boxes, you can read more about them here. Basically, the idea is to fill a shoebox-sized plastic container with new games and toys intended for ill children that you then donate to your local hospital to distribute.

Jared Boxes are made up of very inexpensive items, many of which can be purchased at a Dollar Tree, or some place similar. Emily enjoyed choosing all of the items for our Jared Boxes including (but not limited to): crayons, a coloring book, stickers, a small stamp set, a puzzle, and a card game. She even picked out items for the baby Jared Box: a ball, board book, receiving blanket, small stuffed animal, and bib.

Be sure NOT to include any hair items, and no food items please!

Altogether, it was just $12 to fill two Jared Boxes to the brim with games and toys! We are looking forward to delivering these to the hospital. I was under the impression that they were running a little low.... both of my girls received boy boxes! Nevertheless, they LOVED them!

For detailed directions on how you can put together a Jared Box, click here.

Saturday, June 27, 2009

Happy Birthday, Clara!

Clara has turned one year old! We invited some family members over for a daisy-themed birthday luncheon this afternoon. It was a great success, and it didn't break the bank! The key to planning a party on a budget lies in the little details. These tiny touches do not have to cost much, and might not even take up a lot of time, but are done with love and intention.

The paper daisies hanging from the ceiling came from Big Lots and cost just $2 for the set of 3. The fresh flower bouquet came from our local grocery store. It was filled with yellow carnations, and of course daisies! The napkin rings were made of ribbon with a piece of cardstock attached to serve double-duty as placecards.

In our household, Mark is the baker, and he baked and decorated this cake all by himself. Fresh flowers are a beautiful alternative to icing flowers, and no cake-decorating class is necessary.

Tea sandwiches are a great way to make your guests feel special! I wrapped these in waxed paper to keep the bread from going stale, and also to dress them up a bit.

All this attention made for one very happy little girl!

Simple First Birthday Luncheon Menu
Selection of Tea Sandwiches (Ham and Swiss, Turkey and Provolone, Cucumber and Cream Cheese)
Bacon Ranch Pasta Salad
Fruit Cocktail (Fresh Watermelon and Blueberries served in a Martini Glass)

Drinks
Lemonade, Ice Water, Coffee, Tea

Dessert
White Birthday Cake with Lemon Icing


Tips to Cut Costs:

Keep the Guest List Small -- By keeping our guest list small, I was able to use dishes instead of paper plates, glasses instead of plastic cups, and silverware instead of plastic utensils. This is both budget-friendly and good for the planet.

Skip the Soda -- Lemonade, Iced Tea, and Water are great, inexpensive alternatives to soda.

Late Afternoon Works Best -- To avoid having to serve a meal, schedule your party to begin late in the afternoon when guests have already eaten lunch.

Friday, June 26, 2009

Splatter Painted Fireworks


Oh my, this was SO MUCH FUN! To make your own splatter painted fireworks, you will need sidewalk chalk paint (click here for directions to make your own, it's very easy and inexpensive!), paint brushes, and a black asphalt driveway (or similar surface). Emily and I painted some firework designs and then I let her loose to splatter paint away! I wonder how many calories she burned doing this??

I truly appreciate all of the well-wishes from yesterday's post! I would say Emily is feeling much better now, wouldn't you?

Coming up.... a Jared Box update, a birthday celebration for Clara, and more frugal fun!

Thursday, June 25, 2009

Fart Fest 2009

Yes, you read that right. Yesterday, I rushed Emily to the Emergency Room because she was showing symptoms of what we thought was Appendicitis. Her stomach had been slightly upset all afternoon. Turns out, it was just a locked-in fart on the lower right side of her abdomen. She was doubled over in pain, holding her side, screaming and crying.... That is, until she went to the bathroom and let out what I think could very well qualify for The World's Longest Loudest Smelliest FART!

While we were waiting in the lobby (this was pre-fart, so Emily was in a lot of pain then), one of the hospital's volunteers came to us with two Jared Boxes. This was a fabulous thing, and made the five hours of waiting bearable for both of the girls. I was blown away by the generosity and thoughtfulness of The Jared Box Project. I had never heard of it before yesterday.

The Jared Box Project started in 2001 by the children at Our Lady of Victory School in State College, PA to honor their classmate and friend, Jared. According to the paper left in the box, Jared was "a brave little boy who battled cancer with courage and faith that continues to inspire us all."


Once Miss Emily's stomach feels better, our next activity will be making Jared Boxes to take to our local hospital. For detailed directions on how to do this, click here. Most items for Jared Boxes are very inexpensive, and can be found at your local Dollar Store. Suggested items include crayons, coloring books, puzzles, small stuffed animals, silly-putty, or stickers. You could even get the kids involved by asking them to pick out the items for the Jared Box themselves!

In other news, I am absolutely loving the funny captions for our first Caption Contest! Contest ends Wednesday, July 1st at 6pm EST, so don't forget to get your entry in for a $10 Barnes and Noble gift card.

Wednesday, June 24, 2009

$10 Barnes and Noble Gift Card Caption Contest

I thought this would be a fun contest! Emily woke up on the wrong side of the bed one morning and wasn't her usual cheerful self.

For your chance to win a $10 gift card to Barnes and Noble, leave a comment with a caption to the photo above. I am not affiliated with Barnes and Noble, and comments are moderated. Keep in mind, this is a family site -- keep it clean, people!

Winner will be chosen Wednesday, July 1st @ 6:30pm EST. Good luck!!

Tuesday, June 23, 2009

Favorite Summer Recipe -- Banana Boats

While we were on vacation, one of our favorite ways to end the campfires was with Banana Boats. This technique is also known as "How to make a perfectly healthy banana into a delicious junk food treat". To make your own Banana Boats, you will need: bananas, marshmallows, chocolate, aluminum foil, and a campfire.

Begin by taking a knife and cutting one edge of the peel, as shown.

Peel back this one side of the banana peel.

Your banana boat should now look like this.

With a spoon, carefully scoop out a channel in the banana. Save this for mashed banana with peanut butter later -- delicious!

Chop up chocolate and marshmallows. If you have chocolate chips or mini marshmallows, you can skip this step.


This is Emily's favorite part -- alternate marshmallows and chocolate along the inside of the banana.

Fold the peel back over. Wrap in aluminum foil, and place on campfire until chocolate is melted and the marshmallows are gooey.

Enjoy!!

Monday, June 22, 2009

Look What Came in the Mail!


A few days ago, I signed Emily up for a letter/artwork exchange with a 3 1/2 year old girl named Lu from 4 Crazy Kings. Mama King has a fabulous blog over there, and it is definitely worth checking out. Emily was so excited to receive her letter, and quickly went to work on a special project to mail back to Lu! Hint - it involved paper marbling, one of Emily's favorite activities.

I thought this was such a terrific, inexpensive, and interactive way to teach children about culture and geography. We quickly pulled out a map so I could show Emily where Lu lives and some other neat facts about their state. It was so much fun! Thank you, Mama King and Lu, for such a fun afternoon!

Sunday, June 21, 2009

Happy Father's Day!

I was a little late in posting about this Father's Day craft because Mark sometimes reads this blog (or at least pretends to) and I did not want to spoil the surprise! Emily used this stamp set by Melissa and Doug, some construction paper, a little glue, and some shiny star stickers to make this cute card for Mark. We adore this stamp set and use it for many crafts, handwriting practice, and other reading/writing activities.


On our last date night to Barnes & Nobles, Emily chose the book Perfect Waffles for Mark, which I found quite fitting since she clearly sees him as the "waffle parent". At a very young age, Emily learned that I'm more of a "this-breakfast-better-take-30-seconds-or-less" parent. Making waffles has become part of their special weekend morning routine together, and they are looking forward to trying out the recipe for Banana Oatmeal Waffles. Hopefully, they will let me test a few to make sure they are really good.
Happy Father's Day!

Saturday, June 20, 2009

Vacation on a Budget -- Part II

Here are some other low-cost or free activities our family enjoyed while on vacation in Montebello, VA. (You could probably do most of these on any camping trip too!)

Mark took Emily to the lake to feed the fish. I think she was throwing in entire hot dog rolls -- they were quite stale. Mark tried to show her to break them up into small pieces, but those fish got mostly huge chunks.

On one of the last days of our vacation, Clara turned one before our very eyes! Incredible! Here she is listening to suffering through the three of us while we attempt to sing Happy Birthday to her.

We splurged on a pony ride for Emily on the last day -- $20. I'm certain she will remember Clover (the pony's name) for a long time.

All four of us went in the paddle boat, but it was too difficult to get a photo while the baby was sitting on my lap. Here's Emily steering the paddle boat while Mark does all the work. The boats were just $4 for an hour.

Another free activity we enjoyed was driving down the Blue Ridge Parkway, and watching the sunset from an overlook. Who knew a kid would have so much fun waiting for the sun to go down?

This was well-worth the wait.

Another place Mark could not resist checking out -- Gertie's Country Store. Borrow a pen, and if you can find a space, sign your name on the walls or ceiling (they are covered with signatures of people who passed through). Try their potato salad, barbeque and slaw, and be sure to meet the owners, who are well-known for their hospitality.
Coming up.... more frugal crafty goodness, another fun giveaway, and recipes for tasty (and cheap) summer eats! Mmmmm!
Related Posts with Thumbnails