
 After yesterday's post about making an art smock from a garbage bag, you knew today's post was going to be about a fun, messy project, right? Paper marbling is a bit messy, but lots of fun, and very frugal!
 To do your own paper marbling, you will need: cardstock, liquid starch, water, 2 dish tubs large enough to hold a sheet of paper, acrylic paint, a bamboo skewer, and lots of paper towels.
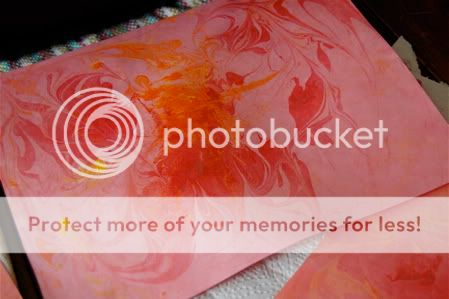
 In one dish tub, put enough liquid starch to fill the bottom of the tub. Add drops of acrylic paint. Try to have colors that go nicely together. We used red, orange, and yellow on pink cardstock paper. Beautiful!
 Swirl the colors around with a bamboo skewer.
 A comb works nicely for swirling the colors too. Very gently lay the paper over the starchy paint. You may want to bend the paper in half and carefully unroll it into the paint to get the designed transfered well. Transfer the paper to the second tub filled with water, and rinse off the starch. The paint will remain on the paper. Lay on a flat surface to dry.
 The finished paper looks like this! Also, the paper feels very soft when it is done, almost like micro-fiber. We will be making more crafts from our marbled paper in upcoming posts!
In one dish tub, put enough liquid starch to fill the bottom of the tub. Add drops of acrylic paint. Try to have colors that go nicely together. We used red, orange, and yellow on pink cardstock paper. Beautiful!Swirl the colors around with a bamboo skewer.A comb works nicely for swirling the colors too. Very gently lay the paper over the starchy paint. You may want to bend the paper in half and carefully unroll it into the paint to get the designed transfered well. Transfer the paper to the second tub filled with water, and rinse off the starch. The paint will remain on the paper. Lay on a flat surface to dry.The finished paper looks like this! Also, the paper feels very soft when it is done, almost like micro-fiber. We will be making more crafts from our marbled paper in upcoming posts!Here's the cost breakdown for today:
Cardstock paper = on hand
Dish Tubs = on hand
Liquid Starch = $1.97
Acrylic Paint = $0.97 each x 3 = $2.91
Bamboo Skewers = on hand
Total Cost = $4.88!!
18 comments:
I think you're missing one sentence where you actually put the paper in! Not too hard to figure it out, though. :>) I'm linking a few of your posts on my blog today - I've popped a ton of your stuff into my bookmarks lately!
Lenetta -- Thank you for catching that! I'll be editing it now.. Oops! :-)
Your marbled paper looks great!
That is beautiful, my girls would love that. We will be doing this.
Thanks for you great idea and thanks for linking.
That looks like a lot of fun!
I remember doing this when I was young, so much fun! Thanks for sharing, I'll be linking to this.
@ Maryanne -- Thank you so much! We spent all afternoon making some great prints.
@ jennwa -- I'm sure your girls will love it. I highly recommend, and thanks for hosting the Friday Showcase!
@ Stephanie -- It is tons of fun, and super easy to do. You really can't mess it up!
Rachel, thank you for linking. Your blog features some fabulous ideas, and I'm honored to be included with them. :-)
Cost of project $4.88
3 rolls of papertowels to clean up spills : 2.99
new towels to replace those ruined from getting paint out of daughters hair : 25.00
not doing project to save my sanity: priceless
That's beautiful! I wonder how big you could make it? It would make wonderful wrapping paper with a paper bag or perhaps one of those rolls made for wrapping sent packages.
Val
AWESOME!! I just bought liquid startch last month and have been looking for ideas. We have everything here to do this, I can't wait to try this with my own two girls!! :)
You could make cards, wrapping paper, a kite :) So cute. Now to find liquid starch. I guess you use this for ironing (?? something I never do)??
@ Sarah -- Those all are great ideas!! I'm not much for ironing either! I was surprised to see on the bottle (which I found in the laundry detergent isle of the grocery store) that it said "great for laundry and crafts". I never realized all the craft uses liquid starch has! It is great for stretching your paint supply, and for paper mache. I never knew that!
@ Pink & Green Mama -- Thank you so much, and please let me know how you make out with it, I would love to hear all about it! :-)
Michelle -- That is so funny! Better hold onto your sanity!!
Val -- I'm not really sure..? I think you would have to have a big shallow tray to dip it in, but maybe you could do it in sections somehow. That would be cool! I'm loving the wrapping paper idea!
Hi Valerie, I used to do this project with my students. The paper makes great end paper for homemade journals. Just an idea! Enjoy the rest of your weekend!
I love paper marbling! Yours worked really well.
I left you an award on my blog - no need to pass it on unless you want to but I wanted you to know how much I'm enjoying your lovely blog.
http://sunnydaytodaymama.blogspot.com/2009/05/awards.html
This is going in my craft-a-day box Christmas gift for my nieces - thanks!
oooh! Your things really are WONDERFUL!!!! :-)
I already posted a comment re wanting to include your posts... was wondering if I could add this one to my "Get Crafty" one - a monthly summary of things around the web... this time themed "Red"?
http://redtedart.wordpress.com/get-crafty/
Again! Do let me know! You are SO creative :-)
Maggy
Post a Comment