Showing posts with label messy. Show all posts

Monday, April 19, 2010

Mother's Day Gifts Kids Can Make -- Ceramic Trivets

Another post in our fun series of Mother's Day Gifts Kids Can Make -- if you haven't already done so, send your husband over here, and maybe he'll take a hint. (wink, wink!) Most of these projects will feature very inexpensive items you can find at any hardware store, so manly men don't need to make another trip to the craft store.

The girls made these beautiful hand painted ceramic trivets this afternoon, and I thought they would make wonderful Mother's Day gifts! They were super-inexpensive, easy, and FUN to make!!

We used imprinted ceramic tiles from the hardware store ($2.64 each), and I let the girls have a go at painting them with acrylic paint. They had so much fun!!

Wednesday, April 7, 2010

Cheap Thrills -- Mud Pie Edition

For a fun time, go outside and set up some sand or dirt on a table with some old baking tins. Add a pitcher of water, and some spoons. Make mud pies!!


I can remember spending entire afternoons making mud pies when I was a kid. I think mine were decorated with sticks for birthday candles. There's something about kids and dirt... they just go so well together, don't they?


Decorate your mud pies (or cupcakes, if you prefer) with flower icing!


Make batch after batch of mud pies, since they sell out so quickly at the mud bakery from such high demand! Phew! This is hard work!


Have fun!!

Tuesday, March 23, 2010

Flower Prints from Soda Bottles

Another rainy day here, and the girls were starting to go through a bit of "messy art withdrawl". We made flower prints using empty soda bottles! In our case, they were empty seltzer water bottles, but you get the idea.

Clara really got into the painting today! She could hardly contain her excitement!


In mind, were similar prints I had seen on various blogs, but had forgotten about until I spotted a few empty bottles in our Invention Kit.

To make your own flower prints, roll out some freezer paper. Dip the bottom of an empty soda bottle into some paint, then stamp on the paper. Rotate the bottle around to make even more petals!


Dip the bottle cap into some paint and it makes a great stamp for the centers of the flowers! The girls took turns stamping with the cap and the bottle. So much fun!


They look so bright and cheerful!


Bonus points for drinking imaginary water from your empty bottle!


EXTRA bonus points if your face is smeared in paint!


I added this post to:

Friday, December 4, 2009

Handmade Holidays -- Festive Wrapping Paper

The girls and I made some wrapping paper this afternoon. It was so much fun, and a real team effort! We used ordinary brown grocery bags, and cut them to lay flat on the table. First, Clara got to work making "snowflakes" with her finger dipped in white washable paint. She loved it!
Next, the paper was passed along to Emily to stamp snowflakes using a white stamp pad...


...and she drew snowflakes using a white crayon. Later, it was passed along to me and I added a few more stamps as well -- just for fun!


We were quite busy making our gift wrap "assembly line" style!!


I think it turned out looking great! When it was all dry.....


I got to work wrapping the gifts (with lots of pride)!


We are counting down the days until Christmas, and wrapping a few gifts with our handmade wrapping paper helped get us into the spirit of the season. Hope you are all getting ready for a fun holiday!!

Tuesday, November 3, 2009

Stunning Winter Tree Silhouette

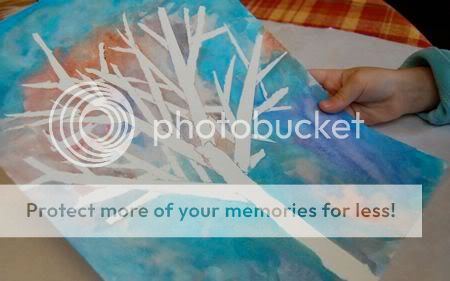
We noticed many of our trees have lost almost all of their leaves, so we were inspired to create something special. With very little help from me, Emily was able to paint this silhouette with beautiful results! To make your own, all you will need is a little masking tape, paper, and some watercolor paint!


Emily went out to the yard and gathered some branches for us to observe. We noted how thinner branches always grow from thicker branches and never the other way around. We made a shadow with the branch and noticed that we could still see the texture from the bark in the shadow.


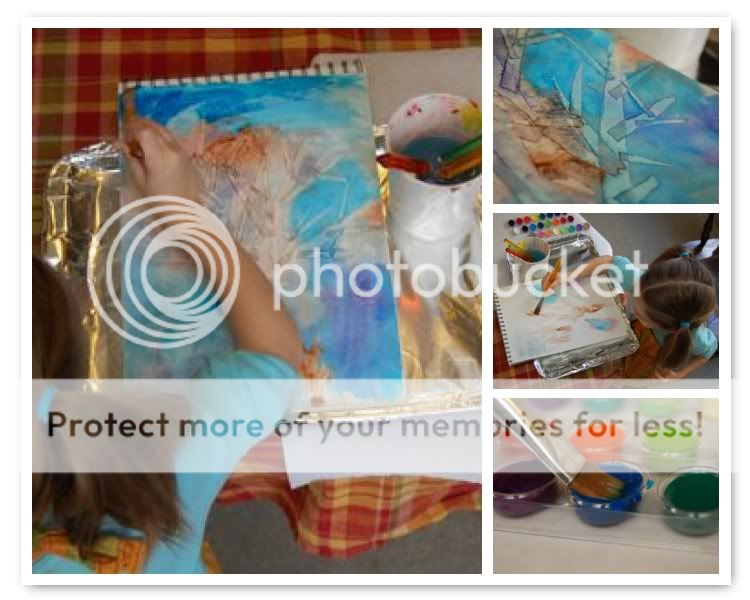
Then we got to work ripping strips of masking tape to use as branches.


She arranged them on the paper so the thinner branches extended from thicker branches. We also noticed how trees have many, many branches!


Next, we made sure the masking tape was pressed down firmly with a popsicle stick to ensure the paint did not get under the masking tape.


Then it was time to paint! Emily went to town with the painting! A little blue here, some gray there... a tiny bit of brown in this spot.


Now, you need to put the project away for a bit. Go for a walk. Get yourself a cup of coffee. Go read the paper. Do a load of laundry. Make sure the painting is completely dry before attempting to take off the masking tape. This is important.

Now, carefully peel off the tape. I found it worked best to pull on an angle, as shown.


Ta-da!


My proud little artist went off to hang her painting in her room. We're going to have to open a gallery soon!!

Tuesday, September 1, 2009

Marbled Sunset Painting

While the sun was setting behind us, I thought Emily would like to paint a picture of a sunset. I wanted to use a technique that would be easy for her, but give great results. This one was a hit!

To make your own marbled sunset painting, you will need: shaving cream (very inexpensive, make sure it is foam NOT gel), a piece of cardboard, paint (we used acrylics), a paintbrush, baking sheet, and some heavy-weight paper.

I had no problem coaxing Emily into spreading the shaving cream on the baking sheet. She loved this part!

Use a piece of cardboard to spread the shaving cream into a thick layer.


Now, add the paint! Since we were making a sunset picture, we used lots of blues, purples, oranges, and reds.


With the opposite end of a paint brush, swirl the paint through the shaving cream with back and forth motions (left to right).


Lay the heavy-weight paper on top of the shaving cream and press down lightly.


Lift up the paper, scrape off the shaving cream, and reveal your beautiful sunset picture!


Emily went on to make several more prints... including marbled paintings of the ocean and wind with the blues and purples. She was so proud of herself!

For a different marbled paper technique we've tried before (and loved!), click here.

Monday, August 31, 2009

Finger Painting Fun in the Sun, Sun, Sun

Just a quick reminder, today is the last day to sign up for our free online sewing workshop Sewing in Baby Steps.

Today, we celebrated one of the last few days of Summer by finger painting Sun pictures!

This was a particularly messy project, but a really fun one that both my girls really enjoyed! Since we had such beautiful weather here today, it was perfect for a messy outdoor art project. Both girls wore old T-shirts inside-out, but if that isn't an option, be sure to check out How to Make an Art Smock from a Garbage Bag.
Emily dipped her hand in yellow finger paint and overlapped her hand prints on a sheet of freezer paper to make the sun. Freezer paper is ideal for finger painting, but we have also used sheets of paper cut up from brown paper grocery bags with great success.

Next, she used her index finger to make rays of sunshine. She enjoyed adding bits of red to mix with the yellow to make orange. Extra bonus points for singing "The Sun Has Got His Hat On" while doing this project.

Clara had a lot of fun with this as well. Emily helped get her started, and then.....
...she took off finger painting on her own! Lots of squeals and giggling!

Then both girls decided to paint together...


So much fun!!

Wednesday, August 19, 2009

Modern Art

This was a fun painting project Emily and I worked on together while Clara took a nap this afternoon. We were thrilled with how this turned out! Mark said he wants to hang this painting up in Emily's room once it is completely dried, and I couldn't agree more.

This painting was done on a leftover piece of cardboard. We used a styrofoam cup as a stamp to make the circles with black paint. (Whenever possible, use washable paints with kids!)


Then we both had fun painting the circles all different colors. Where the circles overlap, we tried mixing the colors together. Emily could paint all day long, so this was the perfect art project for her!


Once all the circles were filled in, we painted any leftover spaces black for a more finished look.


I love it!!
Bruce Gray, eat your heart out. ;-)

Friday, July 24, 2009

Pink Popcorn Balls

This recipe is very frugal, and lots of fun (especially for the kids). It is, however, a messy project. Please note that our family is not afraid of messy projects. As Emily would say, "Messy project? Bring it ON!!" Also, it is not in the least bit healthy. My advice is to let the kids enjoy these, then quickly take them to the nearest playground and let them burn off that sugar high. If a playground is not available, try padding the walls of your house with thick cushions because they will be bouncing off of them.

To make your own pink popcorn balls, you will need:
2 Quarts Air Popped Popcorn
3 Tbsp. Butter
4 Tbsp. Raspberry or Strawberry Gelatin Mix
1 1/2 Cups Mini Marshmallows

Pop the popcorn in the air-popper and set aside. In a small bowl, combine butter and marshmallows. Microwave on high for about 50 seconds. Stir in gelatin mix until the marshmallow mixture is smooth.

Pour over popcorn.

Stir until popcorn is completely coated.

Spray your hands with non-stick cooking spray, and form popcorn mixture into balls.

Enjoy! Then run around like a crazy person.
Mmmm... yummy! And so much fun!!
Related Posts with Thumbnails